We’ve all been there, running out of space. On our mobile phones, in our appartements, and most important of all, on our computer’s file system. You’ve been working and surfing and playing along, watching a movie here and there, installing a game or a new app perhaps, and listening to some great music, and poof… before you know it, you’re harddrive is full. But, you have no clue what is actually eating your drive away.
Fear not! Du to the rescue!
I know, there are plenty of tools available for finding out what the usage of your harddrive is, both for Linux and for MacOs X (yes, “du” works on MacOS too!), but sometimes going via the command line is just easier, or works faster. Besides, alot of these graphic tools simply use “du” behind their graphic shell.
What is du?
Du stands for Disk Usage, and is a standard Unix/Linux/FreeBSD tool, so it should be available on all Unix/Linux and MacOS X variants. Du is built in the typical Unix way of thinking, creating a toolbox that offers a lot of small tools, each specifically designed for a specific job, and being great at it. And “du” is no different. Du provides you with information about the sizes of files and directories. And it has a multitude of options to help you get the output you want. And if that is not sufficient yet, it supports the standard Unix way of working with outputs, so you can pipe it to other programs to get even more options.
Some examples:
Standard, “du” will give you the overview of the current directory, and shows the size in blocks:

Since blocks doesn’t really mean alot to most people, there is the option “-h” you can add to “du” to make it more “human readable”: “du -h” (or –human-readable). This will give you the results in KiloByte, MegaByte, GigaByte and TerraByte if needed.
If you are only interested in knowing the size of everything in a specific location, you can use the “-s” option (or –summarize).

Are you only interested in seeing files and/or directories larger than a specific size? Or just the opposite, smaller than a specific size? Then you can use the “-t=SIZE” option (“–threshold=SIZE”), for instance “du -h –threshold=100M”.
Adding the option “-c” (“–total”) gives you the grand total of everything scanned.
Or you can combine “du” with other commands, for instance, with “sort”, to get the largest on top: “du -hs * | sort -hr”

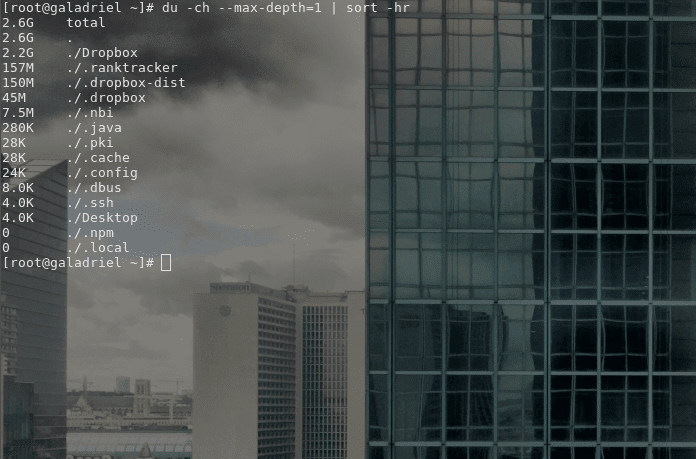
And last, but not least, my favorite: “du -ch –max-depth=1”. I use this command to browse my way up in the diretory tree to find out what is eating my harddrive away, and exterminate it! The “–max-depth=n” parameter tells “du” to not give an overview of everything in the directory “n”-levels away from the start, but only an overview. This helps you big time finding where your big data-eaters are. You just do a “du -ch –max-depth=1” in your current directory, then see which one is the largest (want to make it even easier? use “du -ch –max-depth=1 | sort -hr”), then go up that directory , and do a “du -ch –max-depth=1 | sort -hr” again. Repeat untill you’ve found something you can delete (or, politically more correct, backup and delete, but hey, be honest, how often do you do that!?! 😉 ):

“du -ch –max-depth=1 | sort -hr” Saviour of wasted diskspace
